


To master your track, you might need to have the right equipment. You should be fully equipped with low-impedance speakers with as brutal sound as possible, most likely as authentic as the wave of digital audio, thus giving you room to understand certain noise levels that are to be truly equalized. To monitor your track correctly use gaming headphones, earbuds, original studio headphones, small desktop speakers, stereo, and low-impedance car stereo.
As soon as you manage the right volume levels know the distance to your music, and how high you can push sounds out in the master. Not only one thing will most often suit one producer, but the best is to have the worst-sounding cheap headphones. These are more authentic and do not sell since the makers can’t sell them since they give bad sound. And bad is what you need!
I recommend THX soundcards, which can gain or reduce your track’s properties to fully work with certain types of speakers, headphones, and even earbuds. Remember that some soundcards don’t play your harmful sound levels and distortion. Your track might sound glorious! So a soundcard is often the eternal holy grail depending on how much it filters, so be aware that most all generic motherboard audios will give you good decent quality on a little equalized track!

You want the terrible sound, with resonance, so you know the depth of your track. Then I recommend the THX Sound Blaster SB-1300, especially the Razer Kraken headphones, older is far better, version 1 was best. But you might want the new 32bit and G-6 by Sound Blaster that has that Recon3D for 3D stereo sound in music. But most will be convinced that the old version of Sound Blaster shows more frequencies in disturbance, maybe the new filters still filter too much.

Why buy a gamer setup? Well, it’s because this option is precisely for the best possible monitoring. You will struggle for 2-3 years and never fully accept your track under the circumstances most tracks sound bad in that setup. But eventually, you’ll become a state-of-the-art producer under such means if you get such a setup. But it can make sound levels sound less proper since it can blend certain bass levels without reasonable wrong levels. So don’t trust one setup. Trust all setups and manage good sound in all systems. You might then believe your track will be epic in quality.
To the mastering of your track. Remember that all instruments have a 2000Hz-5000Hz center, which occupies too much in many tracks. A bump of -3dB in the center of 3000Hz in the picture most often creates the right choice but you might want to listen to your mix to verify a dump would be good. We do this like this in FL Studio on Master. When you reduce 2000Hz-5000Hz centers, you will enable your listening capability to be with more sounds; this is often needed when you have tenfolds of sounds and instruments in your track:
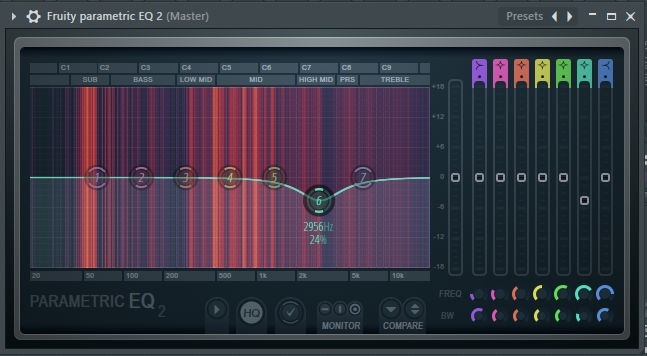
This reduction is something that claps and snares have a hardish dense color right in the center of 3000Hz+, and therefore, some levels are proper to reduce for these samples.
Recommended as well as to use on Master, but be deviant of your choice since adding certain plugins on the master you will have to have this solution before the actual limiter of 0dB since it will sound bad if you use this in the early stage behind other mastering plugins:
 A1StereoControl: Download link 2MB: A1StereoControl-x32 at loopswag
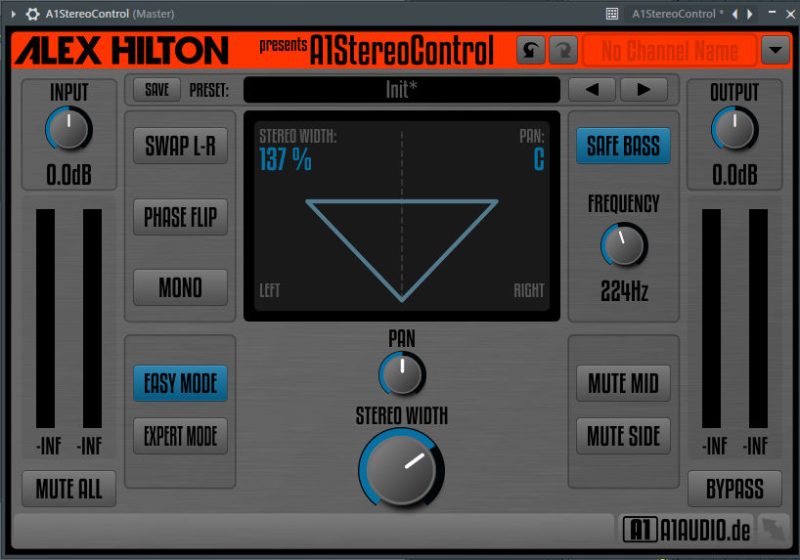
While we only adjust 137% on the stereo width for your track, it can do miracles for a better stereo feel. Remember to put on Safe Bass for 224Hz, often adding effects to bass levels has always been speculated to create a disturbance, so don’t put on the effect on the bass, unless it sounds good, and most times it doesn’t.
Then you can add on your track TDR VOS SlickEQ.
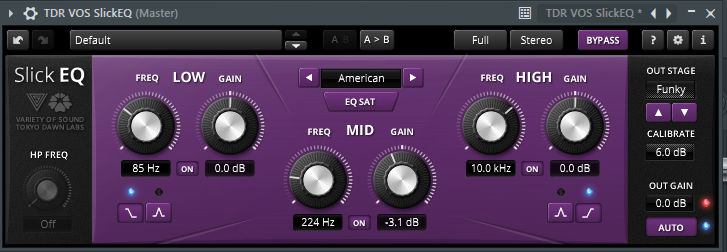
Get familiar by adding a -1.7dB to -4.7dB on 224Hz center. It will remove resonance problems for most tracks. But it also opens more spectrum room for your track. It auto-masters your track in the center of 224Hz. You can reduce this center to about 200Hz but always do what you might think will sound better for you.
This reduction isn’t a bad idea, and it can remove the tension of muddiness in the center of 200Hz. That way, your track will probably sound lighter, and people will often hear it slightly better. Sometimes, different monitoring equipment finds the perfect spot range.
Download TDR 6MB: TDR VOS SlickEQ – at loopswag.com
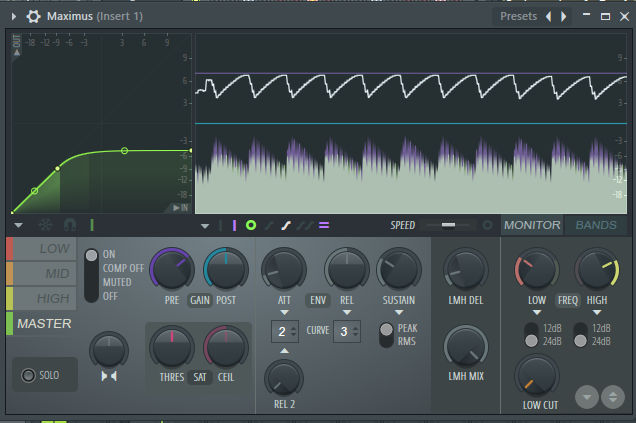
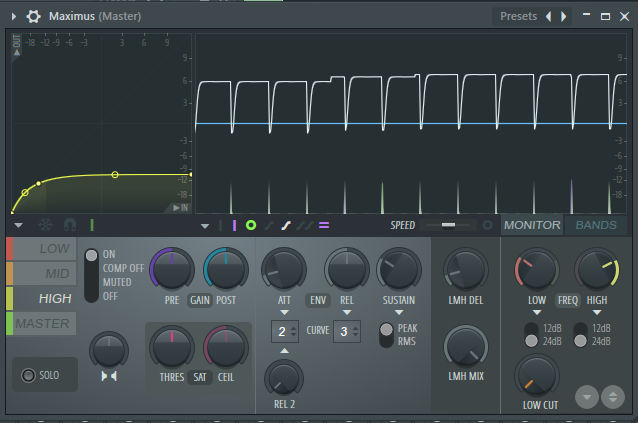
You might want to master your kick in your track. Try adding Maximus and do this trick for any drum you might have:
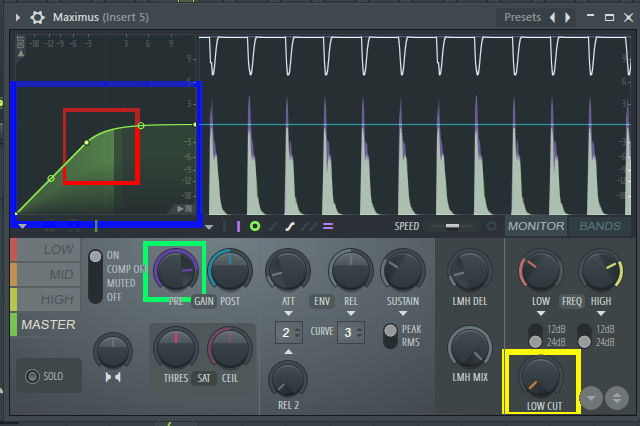
By adding PRE gain Green.
You can gain a mighty level with just the default preset of Maximus. Remember that all bands are set on default, so sometimes you might need to turn off other groups if it’s hard to clip limiting.
LOW CUT yellow:
You don’t want to cut low frequencies with Maximus. That way, you will struggle with your kicks and basses. Try never to use LOW CUT on Maximus, especially on Master as it has a processing problem for the Maximus and is often terrible. And it’s too bad for Maximus. Certain kicks and basses will be either fixed or destroyed by LOW CUT.
The full blue
Shows the envelope in Maximus, this envelope can be edited. Into Soft Clip, as shown in the red field.
That way you will soft clip your kick, and you will then have a more sine wave to the kick at its higher frequencies as the mid-low. However, distortion will not work on this occasion, as it is removed as per use. Remember what you do if you have distortion on with a sound.
And Maximus on Master?

Here the bass and kick are limited at -2dB with this envelope. You don’t need a higher level for kicks and drums as that is the total max you can get for a 0dB track without the master channel limiting too much, and you get a bumpy kick when there is a frequency fight in the wave. It occurs when it’s much in the frequency fields across the frequency spectrum. But remember that having a lower value as described by us, is to use -6dB kicks, that is even enough for most tracks.
We recommend making your kick levels around -6dB from 0-100Hz and lower range from 100Hz+. Do monitor in some equipment maximum lowest, if your system plays the right at even -6dB, why not stick to -6dB? Some musicians do not tend to overpower their tracks, and beginners often don’t overbalance their tracks, keeping a maximum-minimum in their tracks and making a breakthrough with their tracks!
Certain equipment will render sound in the speakers that clearly can take an approach for how your 40-60Hz kicks can be overpowered. Many artists use filtered headphones making them unable to feel the problems. In some way, your levels up to 660Hz can not be known with headphones. What is felt in either stereo or car stereo is easier to understand.
You will know your levels are too high if you monitor them in Maximus or at least Parametric EQ 2. When you see these dense levels you might want to reduce them equally on all frequencies from 0-200hz, then your kick might sound in better quality for many listeners.
For bass? You want to master it to -9dB peaks. the master sometimes even at a lower range of also -9dB would be the right choice. Remember the Maximum Minimum!
Here you see in the example that bass is auto-mastered at -6dB and as well compressed. That way, your bass stays at -6dB peaks, Remember to Equalize your bass after this. A good tip is to equalize before and after the Maximus on bass. But stay at max -6dB with the bass on your tracks. At fully knowing the maximum range of bass it’s often -9dB. Your bass might play well at even -12dB. A higher -6dB level for bass can be too high for nearly all. So stick to the rule maximum minimum.
We truly recommend -9dB for your bass. If you feel it, then most will feel it. Unless even at -12db. But pushing your bass beyond -6dB can be fatal and too hard, and most review your tracks as too bassy at that level. But of course, often the levels from 0-100Hz should be at -9db. But then you have levels from 100-200Hz. That should also lie around -9dB in actual height. And these are played high enough by any speakers.
For bass compression, you might want to use the above solution. If you stay at -6dB with the bass and equalize it again to -9dB then it’s the best solution. Many producers tend to compress their basses and it’s truly one of the important features of many tracks, often a compressed or maximized level of sound on bass can create a better feel and even quality to the aspects of a track. When compressing with Maximus, check other bands but use the MASTER band to use the PRE GAIN knob and push your levels hard enough so that the bass plays relatively the same at any note. This will ensure the bass is compressed and sounds nice all over the track.
With the MID BAND?:
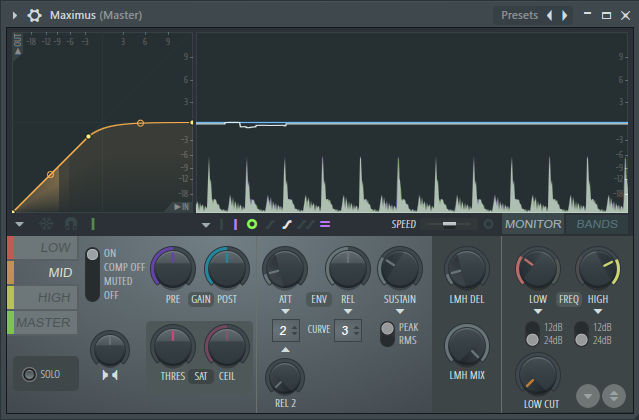
Monitor your kick on the master with Maximus. You see that it has too high levels from 200-3000Hz. Most often, you don’t want the kick to have more than -12dB pressure in the track or even at max -9dB for frequencies around 200-3000Hz. So an edit for the kick was done especially here, remember that levels from 3000Hz to 22000Hz can often as well become too high if you maximize the sound with Maximus.
Equalize your kick accordingly, often having -2dB high levels in the mid-range with vocals wouldn’t be that much of a problem. But most, of you would want the mid-range to be at most -6dB with vocals. A lower level than -6dB will make your track less interesting. So keep the mid-ranges more powered and with more depth and sound levels.
Even just a tiny change of Parametric EQ 2 can make miracles like here, it’s something that is not logical about FL but a smaller bump can do miracles to anything. Even that little adjustment is very hearable in certain dynamic tracks: To the second Parametric EQ 2, a reduction is made to the kick.
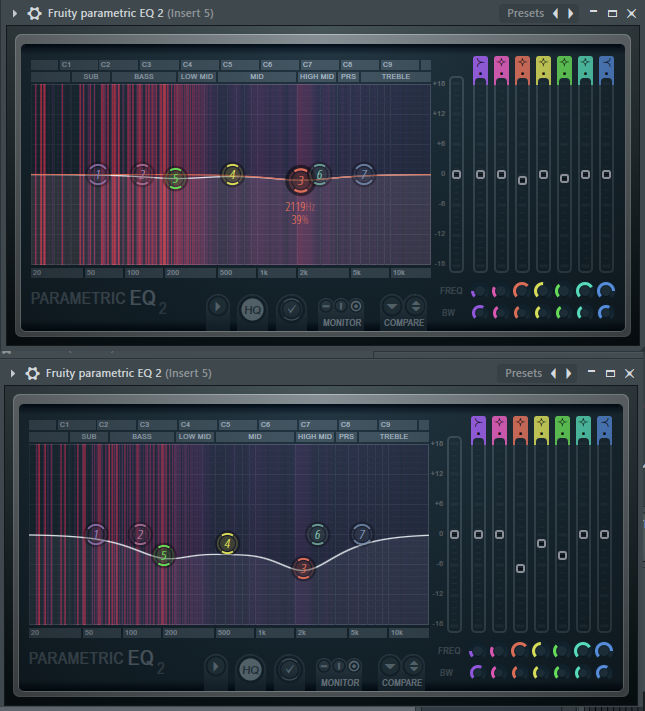
You might try to reduce these levels from -6dB to -12 dB. It plays well as a kick in total.
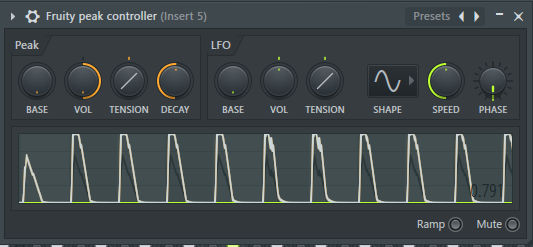
You should try using the peak controller on a kick making it chops like this. Therefore you can use this to sidechain your bass with the kick. You might want the decay more up to the right in the peak controller as you reduce the peak strength. But the tension in the peak controller is as important. The easy solution is to use the peaks connected to a Parametric EQ 2 with a 200Hz Low Cut. But the process is tedious since you need to set the right timing of the sidechain, so if you want to know the whole process Sidechain Tutorial is here:
Another thing. On the master mixer, you can use this option to make -12dB high levels for frequencies above 3000Hz. Having levels higher than -12dB high frequencies is not recommended for a track. And why is that? Since some equipment plays poorly, the higher the levels are especially with earbuds they sound awful. Phones and Android to iPhone. Most have problems with their high frequencies and that’s nearly anyone.
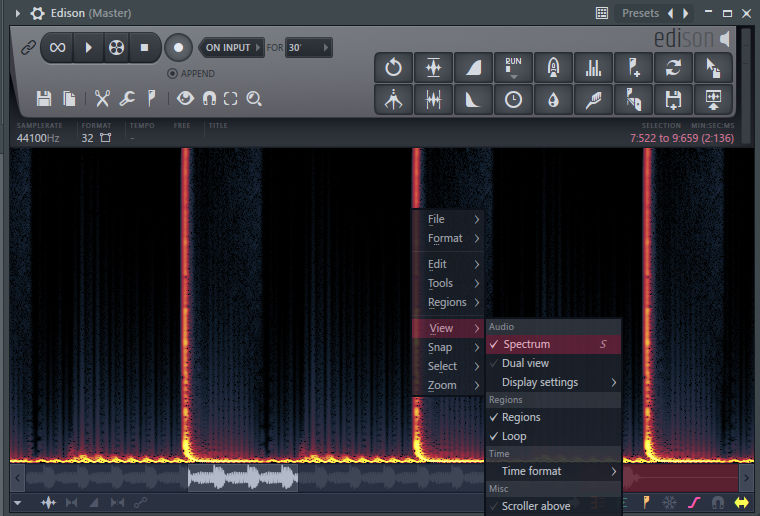
On Master, you should monitor your high frequencies if you have too much yellow in the upper field. This means your track has too many higher frequencies: As with Edison, you can turn on view Spectrum. You need to record with Edison to visualize the wave.
Here is a look at a more proper track. It’s less hard and has a less yellow color to the higher frequencies. Remember that some sounds might reveal harmful levels in the higher frequencies:
Knowing this, you should consider making your track more purple and less yellow. A good dynamic track has a very purple-colored look on Edison. And does not contain that many yellow particles in the spectrum.
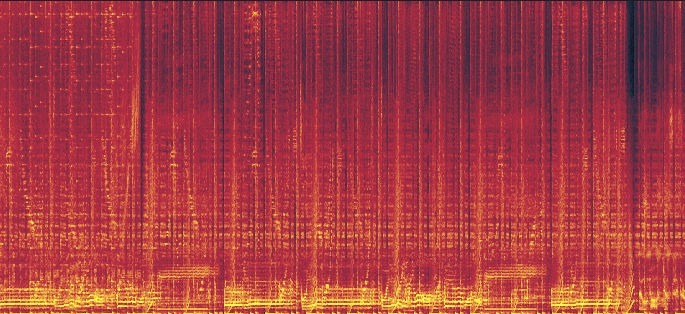
You can see this track has dense yellow on the bottom. This means the bass is running at high levels. A better standard level would be purple to orange color. In many tracks from the mainstream, these levels often don’t get to yellow color and are purple-colored looks.
For your comfort, if you feel you can hear your track’s properties, you might not need to overbalance your track by pushing it to the limit. Sometimes the right track can sound good for others if you keep levels more down than up. And if it sounds good, it probably is as well for most. Remember not to use Gucci headphones or anything that makes all tracks on the globe sound good; therefore, your quality will be bad.
Here you see an adequately mastered track, with no conflict of too high levels. Mastering is done through mixing the sounds properly for the master; it stays dynamic throughout the track.
You don’t want or need to master your track professionally if you do know how to EQ and put in some effort to equalize each instrument in your track.

The recommended way is to use equalization on each instrument by solo playing your sound.
You can solo play any sound by right-clicking each mixer unit’s green LED button.
Recommended use on Master is often 3000Hz cut and 200Hz cut. Of around -1dB to -3dB.
You might need to turn the bass of the kick at maximums to master this application of master mastering with Parametric EQ 2. But we do not always do that unless we use SlickEQ and a certain proposition to equalize each of the most vibrant instruments with these levels.
It’s not always recommended, but as an end mastering, it might be possible to edit all sounds that end up on Master Channel. So an edit just of frequencies that are in particular dense would be a signal of overpowered frequencies. Thus lowering these values would indeed be the right choice.

Recommended for the kicks is as well to use Transient Compressor:
![]()
The ATTACK adds a snap for the first frequency pattern of a kick to be gained.
The release is to add in more boom or solid hard feel at the mid to end of the kick.
You might remember this put on Master:
Do you see the curved envelope above? That is to add distortion to the higher frequencies and glue them together. Test that out on your track, and it can bring a miracle to your track or tracks. Gluing all the higher frequencies along with distorted frequencies. Just remember always to use the default preset of Maximus. Never use the presets in the directory as they might cause problems with many instruments, sounds, or the whole master. You should not use what you know the full change it makes.
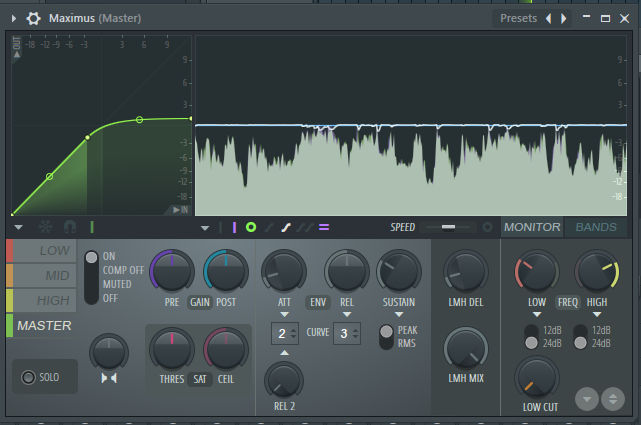
For the master, your track will play 0dB if you don’t push the bass too hard and your higher frequencies are higher than what is described. In such a way, you will not need much changes to the pressure of the master. You might want to compress the track further by PRE GAIN with 2dB or 1.7dB to ensure levels can play harder on phones, so your track sounds much more powerful.
A good understanding by pushing the levels with that curved green envelope is that you will increase by what you hear on all your setups, as soon as you feel the maximum, don’t push it further. And all your frequencies will somehow be higher as desired. But you will hear the maximum you put up for, and thus then your track will stand out especially all kinds of phones.
A track is written in frequencies, and one wave consists of waves of the track. In different matters, you need to see that bass plays high frequencies together while playing the wave of sound. The wave is often sine but looks like a wave and consists of waves and short waves. But frequencies stay in between while having too hard bass can overturn all other frequencies making a limiting of a track a possibility while spectrum fights for frequencies. Don’t overpower your track!
Maximus Master Channel can be set with the envelope to 0dB and with a curve to make analog edits to a limit of up to 0 dB.
Maximus has a 0.1-0.2dB problem but limits at 0dB to little. So your track is less powered overall if you have a lot of limits on the master channel. Often producers use other limiters or compressors, so turning off the master channel on Maximus and allowing a different compressor to compress the sound might be a solution to many. Often reducing many levels especially the mid ranges with Maximus might be a good idea to look for a better sounding experience.
If you follow the tutorial you can create a better-sounding track so remember to use Maximum-Lowest on your track as that is the right thing to do with a track. Hard levels aren’t always the best especially the tendency to make overpowered tracks can lose value to many listeners. Pressing your sound to the limit might be good and bad for many reasons. For most even creating -2dB levels by using a curve in the Maximus to limit to a maximum -2dB and then again play well on phones as the track for many will sound quite more interesting than 0dB but as the sound is felt like 0 dB.
Remember that you can use another limiter at the Master channel than the Master channel limiter in Maximus. A recommended collection is at antress.blogspot.com a plugin called ModernLimiter that you just can put into the master to limit exactly at 0dB.
Download the full toolset of modern plugins here, since they no longer offer a download: But it’s free to download all the time even on their webpage until they fix their links properly.
Download: ModernFullPack at loopswag.com 47MB


7 Comments
What’s Happening i am new to this, I stumbled upon this I have found It positively helpful and it has aided me out loads. I am hoping to give a contribution & assist different users like its aided me. Great job.
WOW just what I was searching for. Came here by searching for a proper way to master.
Thanks for the great article indeed.
hello!, I like your writing so much!
I used to be able to find good advice from your articles.
You have made some decent points there. I looked on the net for more information about the issue and found most people will go along with your views on this website.
It’s impressive that you are getting thoughts from this article as well as from our discussion made here.