


This #Tutorial-FLStudio is about mixing and mastering the better way and a proposition to have a more controlled track, especially in this below-shown way. Somehow you might want to reduce the levels of your track to a maximum minimum rather than overcompressing and destroying your details and precious dynamics.
It’s all about dynamics! Reading this tutorial is the best fire! It’s like changing the increasing volume of your instruments, and they become more vibrant and unique on your track! Making a difference unique as levels are as low as possible but as high as much potential for 0dB.
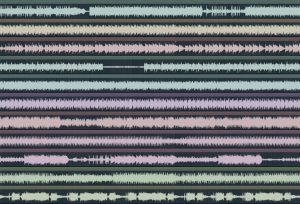
It would be best to have tracks as in the picture below but tracks like that becoming this rather not overcompressed!:
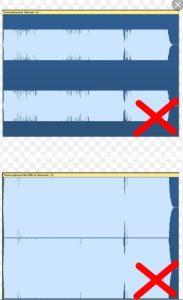
So, How do professionals do mixing and mastering? They do these levels in such couture as the first available picture above. This production to create dynamics might be important. You might as well in the second picture see two different options. One is 0dB the other one is -6dB. You can or should either make 0dB or -6dB music. The difference is a difference but there’s much about it if there is overcompression. At least if we don’t fight the fight for destruction we will surely make a track that isn’t pushed to its limit.
It will ensure you nearly hit away to be a professional in understanding the levels of your music and almost assure yourself that the track has a better professional finish and consistency. Most producers often produce under high compression and create unlogic destruction of their track. Most often, folks think their level of disruption is high enough to pressure the track into mere maximization of the sound levels where it is compelled even under the specific belief, that it’s a high level of sound that sounds good to you. Still, it also looks terrible to some others.

So to the little tutorial of producing a track under means of low-level dynamically competent and pressured to 0dB without the need to overproduce levels higher than enough. You would want to reduce your pressure to having a dynamic look at your track. A well-suited compressor that can gain the amount of levels to around maximum is a well-known plugin called ModernLimiter, with this type of plugin you can push the track into limits. But don’t overuse the option. If you do, you will have over-compression, so small amounts of pressure might be right.
You should not need a limiter on the master if you keep the dominant kick at -6dB and bass and 808 at -9dB below 200Hz and mid-range, to about -6dB of the higher frequencies from 4000Hz up to about -12dB, Aftr 18000Hz the levels should also correspond clearly to lower than -18dB.
Then you don’t need to limit your track. It will most often play automatically 0dB in total. It would help if you tried using the Maximus on the master. To auto-master you kick to around -6dB:
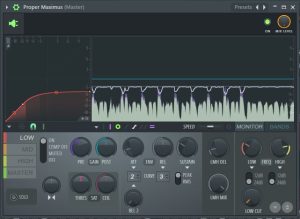
Make an envelope for low like this “red envelope.”
Keep punch jumped up to nearly -6dB on your track.
Gained with either Maximus with PRE or limiter
Always turn off LOW CUT in Maximus why? You will know that it can either destroy or fix kicks. FL Studio programmers did a bad job on Maximus.
The green envelope below on the master will provide a soft clip of your track. And any means for all your sound, you should always use a curved envelope if you hit the maximum limit with Maximus, and the wall is called a Hard Clip. Then always make your Maximus curved solutions.
You can reduce some an ultra-small effect by turning off all bands in Maximus before using the sound to avoid a hard clip if it happens. On certain sounds, the standards might hit the limit. The PRE option can also turn these levels down often. It’s a good thing for any audio. Most often, the Master Channel PRE GAIN is by its state used in making the possibility to reduce levels and simply the whole Maximus can be monitored to understand all aspects of a track.
You can reduce levels by monitoring with Maximus. That is also a unique toolset for production monitoring and understanding your levels with Maximus to reduce them to the proper limit. That way, you can achieve the preference explained to a track.
-6db kick, -9dB bass, -6dB mids to even -9dB mids, and -12dB high frequencies. That will play at most 0dB and seldom hit the limits. And even limiting wouldn’t be needed, but always make sure to have some 0dB limiting for a track.
Your track will also sound more professional and not maxed out and might maintain a more professional end sound. Even your record will have decent quality on most units when problems with resonance and not well-equalized sounds are gone, so make sure you reduce the most irritating noise and distortion out of your sounds to have a well-balanced track. When it comes to producing you must create quality by destroying noise not relying on one setup of speakers but a set of plenty.

High levels cause issues for many listeners, especially when all sounds are maxed out. But it’s more important to reduce levels of EQ than to overcome them. Often, density in hi-hats is preferable to reduce than to reduce the levels to a minimum.
But the most important is to keep levels at a minimum maximum. As soon as you hear them you don’t need higher levels; simpler it doesn’t get. But be sure to use speakers that can play interesting noise on music, rather than equipment without any monitoring capacity when all music sounds glorious in the stereo setup.
A more dynamically right track often has lower levels but more sound and instruments. It usually sounds better together as all sounds are equalized and do not interfere too much at high levels. Often a clash can create problems for you, so a unique way is to equalize properly, you might want to learn more from this tutorial:
How to EQ – The Basic Way – Learn More – Become Professional Using Parametric EQ 2

Often low levels of achievable hearing are preferred and sound can be more exciting. It is also more professional, and you can throughput many sounds together to play simultaneously. The more you put into the track, the more reduced track should be to sound hearable of all instruments even at the lowest achievable levels.
And when you might set some levels just far higher to make them more preferable for the listeners to understand and hear. For example, some guitars would be higher in volume around 1dB to even just a little use of 0.3dB higher than most of the instruments, and then it’s more distinct on its own.
Instruments, in general, don’t need to be at the highest level; the more reduced they are the easier it is to hear them at the lowest levels, and they are dominant at that level. Still, then again, your possibility to achieve a larger scale of different sounds in the distinction of tones is possible within the track.
Much different music at the beginning of the era had these low levels. Even some professional music used as royalty-free music often has these levels under the highest lowest possible since some music for movies is played at a rate of -6dB.
There is no need to push your track levels to the max. And if you drive one sound higher, you need to increase more sounds higher, until then you clash much together and have a problematic track. Keeping the balance is done perhaps when you mute all sound levels, and then push to the maximum level you want them depending on how many instruments and sounds you have in total, and then increasing all sounds up to their desired limit would be a good solution to many who would want to make a dynamic track properly.

Often bad mixed tracks can look like a dildo and sound generally good because some equipment does filter your music. That was new when Trance came out; systems needed to adapt to the auto-mastering tendencies of methods to that music. Some systems have copper filters that intend to make the sound more delicate. These filters are placed inside the speakers and often have a higher impedance to the system, thus delivering lower levels of noise and a more pleasurable sound level. Therefore as well as reducing resonance to a low level.
Having a method of making music without hearing the resonance depth you can, for some, will become problematic. And some don’t buy these beats or listen to the music or the artist for nearly all eternity. If your system does have any of these types of processing, sound might be a harder issue where you don’t hear anything than good sound.
Avoid these systems and get yourself even the cheapest as well as plenty of earbuds, even creative soundcards. Even gaming headphones, as soon as you rightly equalize the levels in all these systems and learn what is a bad sound you will most likely succeed beyond others. For some quality matters, for some it’s important, but if your career is fresh, start making quantity. Most really would want to make hundreds of tracks, and then when you are ready, read all these tutorials on LoopSwag and then be able to make your tracks under greater quality.
And the listeners don’t tell you if it’s terrible, they don’t do, some can, but seldom they most often hop to other music!
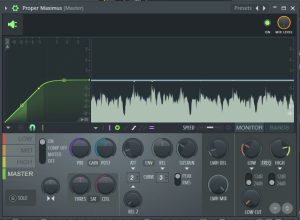
Our Bonus to this tutorial! Get the Maximus Preset to work with your project likewise in this tutorial, all you have to do is to apply it and more likely mix under its limits, as perhaps you should try monitoring your higher frequency levels towards their total into at least -12dB:
Download in a few bytes:
Proper Maximus Master Preset on loopswag.com


11 Comments
Really learned to make my tracks fire and hot!
Made my production a lot easier! It is cool stuff!
Cool Stuff! Really helped a lot!
Hi there! I could have sworn I’ve visited this web site before but after looking at a few of the articles I realized it’s new to me. Regardless, I’m certainly delighted I stumbled upon it and I’ll be bookmarking it and checking back regularly!
Like!! Great article post.Really thank you! Really Cool.