


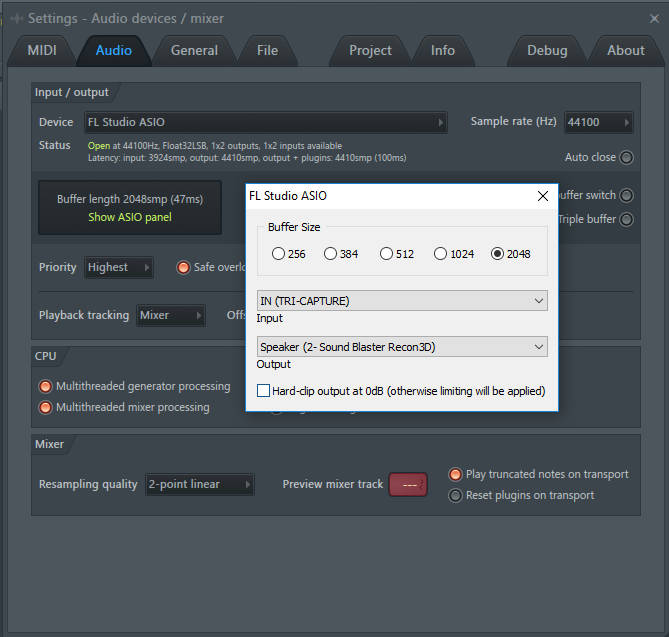
To record with FL 12, you have to set the right input for your soundcard.
In ASIO settings The hard clip isn’t good since it will clip your sound hard and not reduce the amplification softly. That is often an issue with FL Studio Asio, so instead have that off. But remember to as well not set your input to way to high than you do deliver, make tests several times see what suits you. There is no problem recording -12dB vocals as you can gain around 15dB with Maximus and still have studio recording vocals out of them.
Tip: As we would recommend, it is to remember to see your levels of input. A red light in the monitor is not good since it’s too high levels. And even the recorder will have a problem. But yellow is all good. Try not to achieve a red level top at any recording. That will result in distortion in addition to your most heavy sound levels.

But you can somehow change your levels later on higher with even a Fruity Limiter with the default preset. Mostly without a problem. But even with any gainer as Maximus, it is more recommended to use, but kind of the harder working way. Remember to as well, denoise the audio first:
Tutorial for denoise is here:
https://www.loopswag.com/fl-studio-tutorials/how-to-denoise/
The buffer size is essential if your project clicks and makes sudden cuts, often when the project is heavily loaded with hundreds of plugins, or if your computer is wrong and have an old CPU. So remember to set higher if you are working on a project. Besides setting it to 256 in buffer might as for most also be too little on a laptop. Try 512 or at least 2048 if you are getting problems that you can find besides “Safe overload.” The buffer size also depends on how much milliseconds you have to delay the recording when you recorded your audio, so remember your setting, “we talk about this later.”
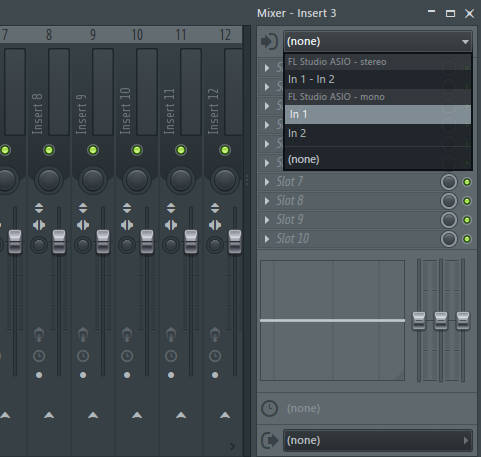
After here, open your mixer unit and chose from the (none) the input you used if you have stereo input, select stereo. It might be useful for different instruments that go to stereo-like hardware.
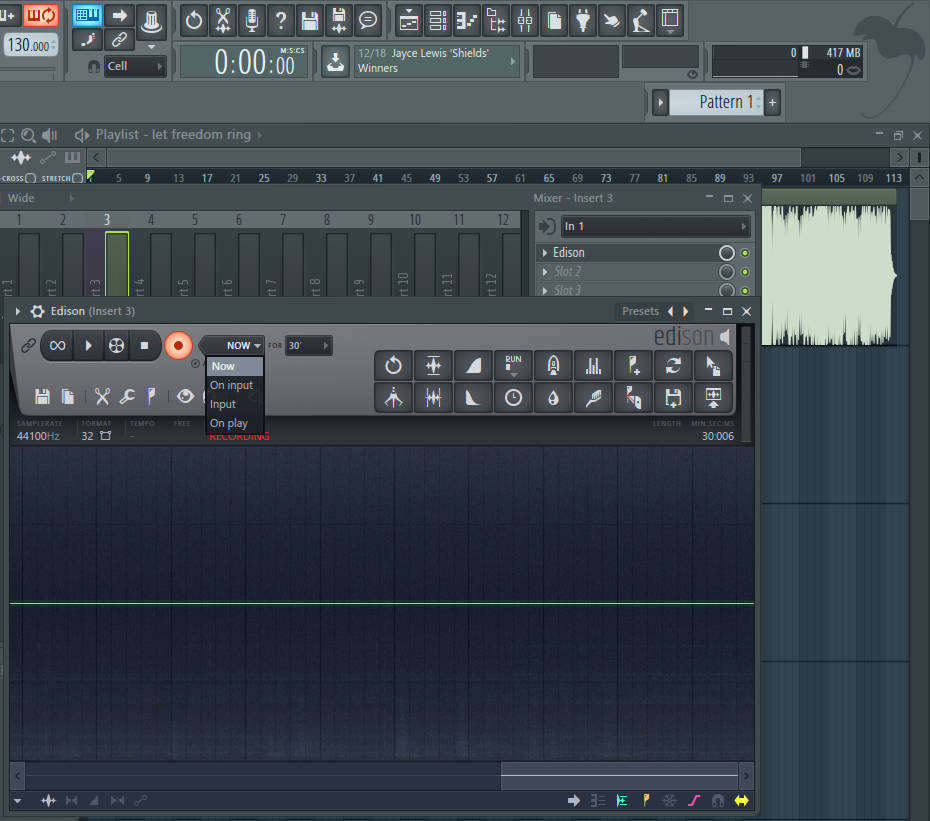
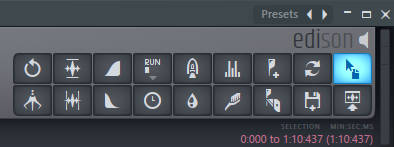
Now add in Edison to the mixer unit and use it to record with later. “30 minutes is as default setting with Edison on FL 12.”
Three minutes with FL 11! So remember to set that value higher, so you avoid recording over all your records. That can literally kill your recording if you are unaware.
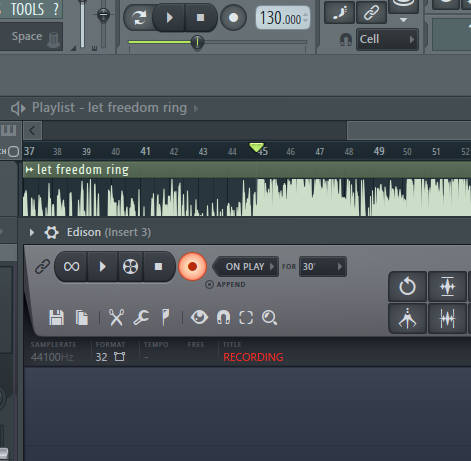
To set on the recording. you will have to choose between 4 different start positions recordings besides the red record button. “NOW, On input, input, on Play.”
You might often want to have that on On Play as you can then record from the start of your project. It was thus giving a mark on the recording when it started. You can, though, choose any start position you want, and it will then be more comfortable to put the recording into the track; you might want to use this method if your track has a long intro, and thus you want to start recording at a different position.
For many, it will irritate that when you hear your voice while recording. So try pushing the green button! To turn off your voice, as turning off the single mixer unit while you want to record.
When you finished recording. Always remember to save the vocals. That you can do this way:
So the vocals then go to your folder after you drag and drop them into a playlist or step sequencer with the blue button as shown here; The folder is: C:\Program Files (x86)\Image-Line\FL Studio 12\Data\Patches\Sliced beats
You might find different ways to record. Perhaps you are not the best rapper and have some mental problems and have Parkinson, which gives you a monotone voice, and you aren’t able to sing more than one sentence at a time. Then this is needed to know that you can start your track at right position:
You are then setting your start track to bar 45. Like you push button on green play start. Then begin to rap at a bar of 49. Maybe you have the setting in Edison set to “on the play,” then it will make a marker in the track for your track. So you remember where to put the track in. Remember the buffer size! That will cause you to need to move your vocals somehow a few ways to the left based on buffer size delay.
Applying your set to play it will create a marker, and then this rule comes to play:
With some buffer size, you don’t hear the difference, at some low as 512smp, and that is around 12ms. You don’t feel it, but:
You then need to set your vocals around -12ms to the recorded song if you need the right placement if recorded the track with that level from the use of Edison with play option. You can as well remove 12ms of your recording.
12ms isn’t the as well right position since you need to take into consideration your plugins delays. Some can even become 0.5 seconds. “At around 500ms.” So the crucial thing is to have delay compensation always on. You might find the automatic option in the info of the mixer. But that isn’t still enough sometimes, but you will have to find a position. The simple rule is always to set your vocals by minus placement in the playlist, not dead the same as the project. But often, you have to figure it out when using several plugins to the vocals. And thus add with how much your sample delay was.
An excellent way to change ms is to move either the vocal sample or perhaps put your own value towards the vocals at how much delay you need. You will have to use minus 200ms, not 200ms “-200” amount since that will create a delay which will then be before. But as well, you might often need to set your vocals more precisely, and that’s the best option.
The 12ms isn’t often felt. But try a test setting the buffer size higher up. And if it does delay the setup. Then the buffer size is applied. Some systems run hardware, and there is often 0 delay, but measured as 1-2ms. So you will have to know your soundcard delay time, and it can as well be 10ms.
Lastly, in order to save the recording and not in sliced beats: Save the project into a folder. “Make a new folder.” “Then save the project.” “Then use the File – Export – Export Project data files;” that way, you will have your files in the folder where you save the project. Even the recording and all samples.
Then you will have your vocals saved into the new folder. While your 32bit vocal as well will be in the sliced beats folder of FL12, that can cause heavy use of space after a while; remember not to delete FL Studio folder after years of production. But always have backups for your project, some are losing them, and there is a problem in specific ways that the recording didn’t follow the project.
You might want to learn how to send projects to others? We, as well as written how to reduce the 32bit wav files into small files in a convenient way. Learn it all here:
So why does a 24bit soundcard cause noise? Well, it’s because of no dithering option for 24bit becoming 16bit and then becoming 32bit. Since FL Studio is 100% 32-bit, you even don’t need dithering with 32bit.
We recommend always to use 32bit recording equipment with FL Studio. You will most likely attain certain more levels of noise with 24 as not entirely that much with 16bit soundcards. FL Studio is most likely very bad at using 24bit sounds thus because FL 11-12 was giving problems to 24bit rendering. But things might have changed more into the FL 20.
Tip: You will have to set the audio settings correct, but you will have to remember the settings for your vocals in order to make the delay. The delay is done by appropriately setting your vocals in – in the recording. As well with earlier FL 12 to 20 to set the value of delay compensation to – “minus” level in the mixer.
But in FL 11 to few FL 12. You should set the vocals by putting them before the project.
So perhaps you want to enable delay compensation as well. But for FL 12, it was wrong. And some versions do delay compensation wrong. Still, it’s not entirely the best option for individual tracks where FL can’t detect the actual delay the plugins make.
So you will have to set your vocals by cutting them in the beginning before the music.
That can be anything from 20ms to even 200ms to even 500ms.


1 Comment
I blog often and I really appreciate your information. This great article has really piqued my interest. I’m going to bookmark your blog and keep checking for new information about once per week.