


When you make a track, most often your bass and kick will play together. Therefore it’s often important to sidechain the kick with the bass and the 808 bass drum with either the bass or bass with the 808 bass drum.
Learn a unique technique of Sidechain to remove muddiness and add room for a kick with the bass that is played in your track, like a professional. This is probably the lazy mode and is more precise if followed up on with delicacy on tuning with delay of the plugin peak controller:
This is the easy tutorial; Send the kick to a channel where you play the kick, then send the kick to another mixer channel with a “-24” or “-12” ms delay “Yes, Minus” where a peak controller is added, such way the controller is delayed back in time and muted, which then adjusts the parametric EQ 2 “200Hz cut”, which is connected to the peak controller on the kick you have on the bass or 808 in your mixer unit. This makes holes for the kick to play freely when the bass plays. After this procedure, you will have perfect holes for the kick against the bass or 808. And minus milliseconds only work with FL 12.5+
The ms delay reduces levels up to -24ms before the kick is played, thus giving the speaker a chance to rest and play much kinder levels of kick. Thus enabling the difference between glued bass and kick, if levels are maxed out. Thus, giving room for excitement to the listener.
You need a high peak for the peak controller, so add a compressor to heighten its level, preferably a fruity limiter, and keep the peak to 0 dB. That way, your sidechain will be full and at 100% volume level.
Then adjust the peak controller to show peaks of kick when they play. Worry about too much Sidechain as well as too little.
Not using a sidechain can cause the kick to be at a higher level when the bass is played together. Making your track play differently, or at least bad for many other newcomers who use side-chain in different techniques, current and incorrect. Thus making characteristics of being muddy or at least an annoying sound to many listeners, as perhaps glued bass and kick, where there is no kick feel or bass feel. They will not comment on your tracks and would most likely step to listen to something else if they can feel the bass levels of your track.
Specific analog sequencers like Yamaha RS7000 didn’t give those sidechain problems, thus delivering low-level muddiness when the kick is played with bass at certain bass levels, to a better quality process. But for digital music, that was quite different, and it introduced the need for amplifiers, which could filter these problems more precisely. Analog systems have higher wattage power and can blow your speakers, but the difference is the digital sound processing, which can have certain limits to what an analog system can provide to your speaker system, with higher raw quality.
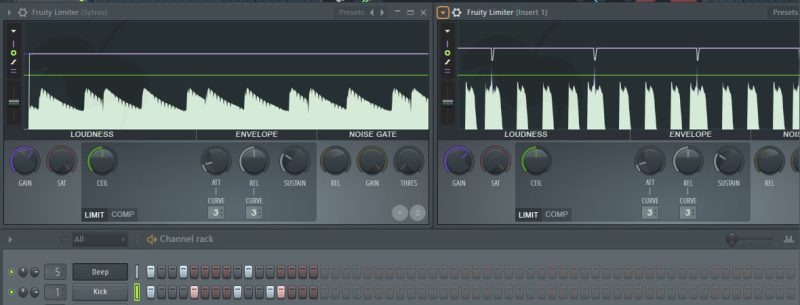
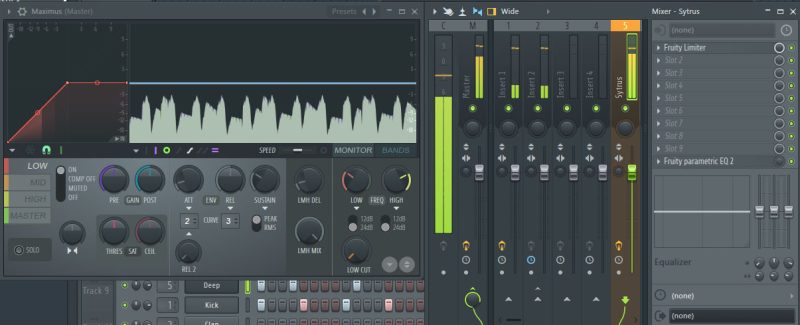
First, to master our kick, we gain the kick and compress the bass to a certain level with Maximus or Fruity Limiter. “Using the Gain” And using analog compression to around -6 dB or -9 dB. You will see this limited on the right Fruity Limiter “Picture Below”. You should avoid this in all of your tracks, one spike that gets nearly hard clip limited, which can cause some distortion, out of proportions and is only a bearable disturbance on a few laptops. So watch out for any compressor for these levels if you hit limits to the plugins if they show 0 dB when they are not pushing above 0 dB, When analog compression is not used, that limit you are pushing to the bottom the distortion might sound like clipping if even used as little on the wrong equipment with no distortion filtering as some equipment as laptops speakers might render this specific of a clipping sound. Thus, your system gives no particular ability to monitor the problem at most, but it’s only viewed monitoring that is possible.
Besides, using the gain in Fruity Limiter is like doing the right thing. But you, of course, need to reduce the wrong levels of your kick and your bass to further better avoid muddiness with this sidechain technique below:
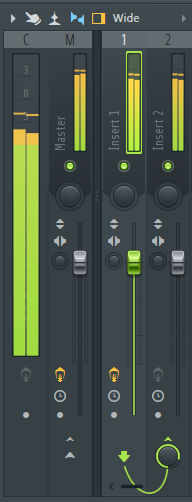
First, you should route your kick to one channel, where you will have your Peak Controller with muting of that channel. Then route your kick to another channel that is not delayed, where you can put effects and equalize your kick in perfect motion. Remember not to send the initial kick to the master channel with two different versions of your kick.
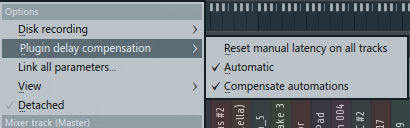
On the mixer unit, you should set your perimeters in such a way that Plugin delay compensation is enabled. This can be bad on some songs. But is now perfected in all FL Studio versions and makes your track stand out better.
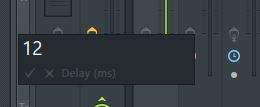
When you set your sidechain on all bass-driven sounds should have these settings: add 8 to 12 ms delay as above.
You can, though, avoid sending it to the new mixer unit. You will increase certain levels of kick with the above picture of the limiter, enabling you to turn off the mute on the peak controller so you can avoid sending it to the master. Either way, you need to do this procedure so the kick will be sourced out to the master once.
When you add the Peak Controller to your kick at mixer unit 2, when it has enough levels, try to maintain the peak to reach high enough levels in the Peak Controller. That way, you can have the peak controller to achieve the best possible reduction of bass when the peak is on.
The tension, if you set the pressure more to the right, you will eventually get a spike, which will depend on the actual volume. Have the right level in your peak controller. Since making changes to either TENSION or DELAY requires much information that needs to be perfected. Too much room, too little kick, and the kick will glue with the bass. You need a gap for your kick!
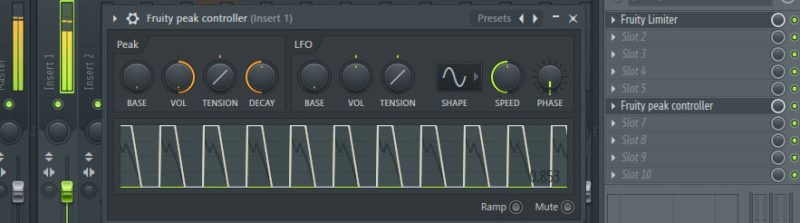
Remember to set decay as high as possible, but not too high. But as good as the kick is, and how long it is in itself. Having a higher level of decay will ensure that the effect of the sidechain does not stay for too long. So that the cutoff of the sidechain is made more like how your kick is, the tension sometimes might increase the peak level and thus give you the right characteristic of your kick. Often, the peak should be around 0.5-2ms bigger than the actual kick.
In the picture below, this is a more decay-reduced peak than the above picture; it will be lower and more likely to be how your actual kick is. The peak controller might sometimes need this adjustment because it is already specific to deliver a higher range than the kick sound. It’s often dependable by the default volume level of your kick.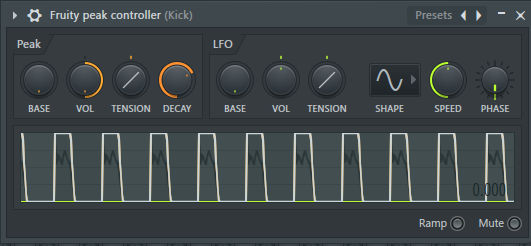
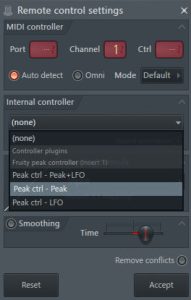
Now with your bass channel or your bass instrument. Put Fruity Parametric EQ 2 into the mixer. Then right-click on the white mix button of the plugin. And “link to controller”:
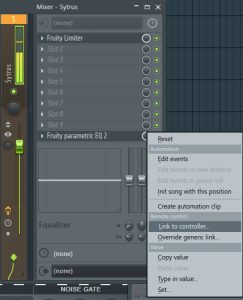
Then choose the Peak ctrl – Peak or exact specific Peak and not LFO. Then push accept.
“Remember to turn off Remove conflicts if you use several basses for the sidechain procedure so that your connections aren’t reset”:
![]()
In some other techniques back in 2008, the inverse of the peak was essential to be used in the proceeding, but the ducking of the mix of Parametric EQ 2 does not need that.
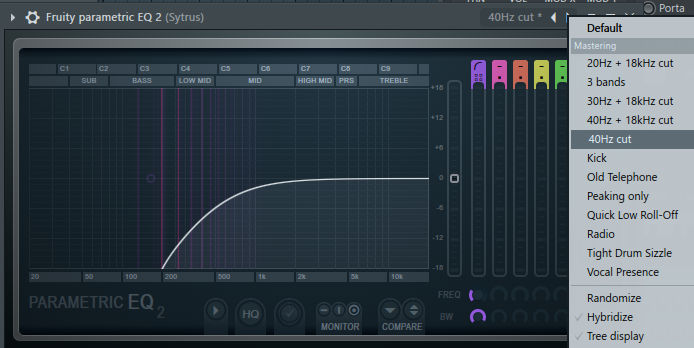
In the parametric EQ 2, choose your preset 40Hz Cut.
Then drag from 40Hz Cut to 200Hz. Then use the middle mouse wheel to make a curve like in this picture:
“This is a good option as well to use on your pads and instruments that need 200Hz below removal.”
Most likely, your bass and kick will be side-chained. You are thus giving the ability to play certain bass levels above 200Hz with the kick, making this specific procedure a proper procedure for your listeners. Therefore, centering the Parametric to around 100Hz is still possible. But you need pro equipment with low impedance to avoid getting problematic muddiness if you can monitor your levels by that specific.
Disclaimer: Sometimes, when you sidechain, you might add the specific probability of having no feeling of bass and kick; thus, this would end up with you having zero capability of feeling any bass levels. Then surely there might at specific points add up a particular problem which your procedure of sidechain has to short effect with the peak controller delay. But as well, under such means, you will have no attack on the sidechain of the bass.
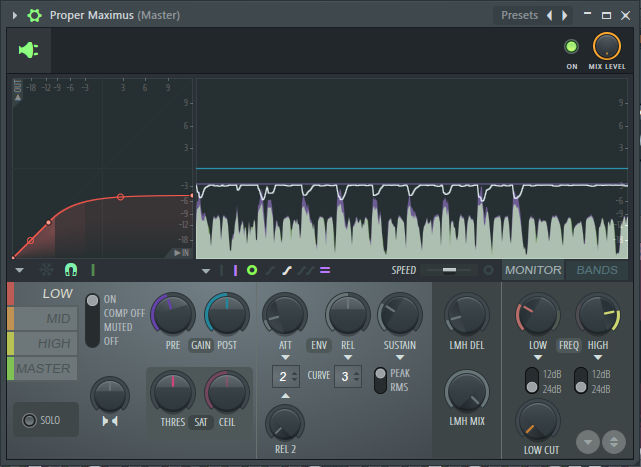
Thus in these moments, we recommend using the delay compensation in a more specific way. To attain a small hole when your kick is in play after you start to sidechain the bass. Making holes is probably an essential process and is shown by this picture, where you can see the bass has one hole line. This process ensures no gluing of your kick and bass together, making room for opening up for your kick to be felt in the way the listener listens to your music. Glued bass and kick aren’t recommended for any use in a track, as it sounds as if there is no bass.
But that’s not all:
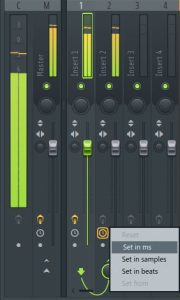
You might need to set the ms of your tracks to kick. If you have an automatic plugin delay, you might not need to set the timing, but for beginners, it’s best to use automatic plugin delay compensation so you don’t have to worry about it. But even with automatic delay compensation, the timings aren’t super perfect, even for anything explained by us on the glued sound specifications.
But anyway, you should avoid using automatic timings with a sidechain this way.
Here is how you set your ms:
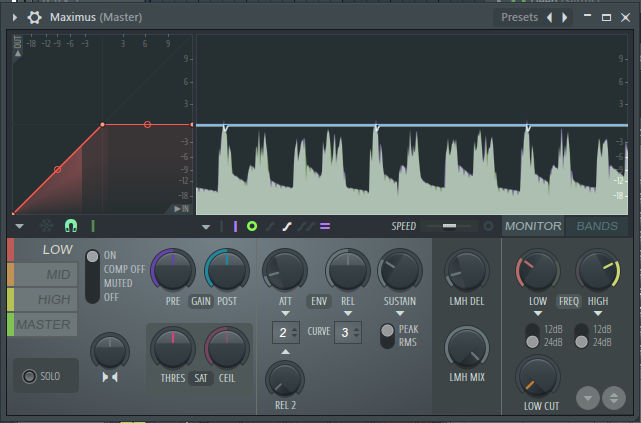
Here it is most likely good side-chained, but you might only see a certain level where this is somehow glued, and in total, you need those small lines when peaks of the kick are coming. This incorrectness can be monitored with Maximus. You should try to have holes of zero dB. When you have holes, you have a pause in the speaker, which allows for a new bass feel of the bass or a new kick hit.
By utilizing music, a dominant kick often is used in electronic music, EDM, Techno, and Trance; thus, when you feel bass levels at nearly -9dB, they still are enough for most people to understand as well as good levels. The recommended level of a kick would be -6dB for a track with -9dB bass. But even a -2dB kick and -6dB bass is also a good option, but overload in many speakers. Too high bass levels might be a different problem for most. But the sound systems gain the levels if they are low and don’t gain if they are at max. Some systems reduce the 0dB plays, so maxing isn’t always important. Most of all, maxing is bad.
So enjoy Sidechaining comfortably and adequately.
Important notice – FL Studio 20 has changed its use of the ms option, and as well giving “-“value, as well as the compensation, is set more appropriately for automatic procedure without the need for ms reduction. But we like the specific to check with each FL version the needs. So monitor with Maximus!
Dealazer developed this technique in the first glimpse of it.


11 Comments
You ought to be a part of a contest for one of the best blogs online. I most certainly will highly recommend this website!
Greetings! I’ve been reading your website for some time now and finally got the bravery to go ahead and give you a shout out from Kingwood Tx! Just wanted to mention keep up the great job!
Hello. remarkable job. I did not imagine this. This is a remarkable story. Thanks!
My brother suggested I would possibly like this website. He was once entirely right. This submit truly made my day. You can not consider simply how much time I had spent on this info!
Thanks!
Thanks for your marvelous posting! I definitely enjoyed reading it, I want to encourage you to definitely continue your great work, have a nice day!
I was recommended this sidechain technique by my cousin. You are incredible! Thanks!
Thanks to my father who shared with me the topic of this sidechain, this blog is really awesome.
Good day! This tutorial could not be written any better! Reading this post reminds me of my good old roommate! He always kept talking about this.
We are a group of volunteers and opening a new scheme in our community. Your site offered us with valuable information to work on. You have done a formidable job and our entire community will be grateful to you.
Quality posts are the key to be on focus for the users to pay a quick visit to the website, that’s what this website is providing.