Facebook Twitter RSS
    LoopSwag 📓 – FL TutorialsLoopSwag 📓 – FL Tutorials
    Trending
    • Extremist – Distortion Plugin for anything
    • Why and how to master most of your synths and pads?
    • PissCutter by NovaKill – Analog Dry Sound
    • How to Denoise like a Pro in FL Studio
    • How to record with FL Studio
    • Horizon Cool Ambient Analog Synthesizer of Diverse Quality
    • Hahaha CS33 – Yamaha Processing Instrument – Analog
    • Classic Plugins VST – Collection of old mints
    Facebook Twitter Instagram
      • Home
      • Blog Listing All Posts
      • FL Studio Tutorials Books Tips & Tricks
      • Instruments VSTi Downloads
      • VST’s Effects Downloads
      • Music Theory Tutorials
      • Projects
      • Samples & Loops
      • FL Studio Tutorials Books Tips & Tricks
    • Shop School Mentor
      • Shop | School
      • Shopping Cart
      • Checkout
      • Mentor in FL Studio for 3 months – Super Unique Chance – 3 Spots
      • Contact Us
      • My Account
    • User
      • My Account
      • Profile
      • Settings
      • Invitations
      • Register
      • Login/Logout
      • Password Reset
      • Contact Us
      • Terms of Service
      • Privacy Policy
      • Log Out
    • Essential Tutorials
      • How mixing and mastering would be done by professionals? It’s all about Dynamics!
      • How to Sidechain like a PRO? Your bass with your kick? Learn a new and probably best technique for this
      • DeEssing on Syllables and s and f letters that clearly make the shii sound in your vocals and the hiss
      • How to compress? Bass or 808? With Maximus?
    • Tutorial List
    • Login for Real Forum
    • 0 items€0
    LoopSwag 📓 – FL TutorialsLoopSwag 📓 – FL Tutorials
    featured image

    Basic Sytrus Tutorial and Usage to Make own Preset

    4
    By Swagger on December 21, 2024 FL Studio Tutorials Books Tips & Tricks
    You can make your own presets with Sytrus with this guide.
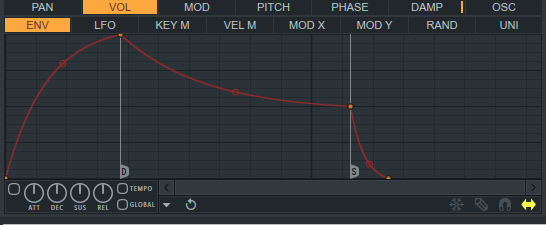
    You need to know what an envelope is with its basic understanding as ADSR: 
    Attack, Decay, Sustain, Release
    The easiest to learn is that attack is how high sound first milliseconds a tone is.
    Decay is for how long the tail is or when the sound ends.
    For example, an 808 drum has a long decay high attack.
    The decay can sometimes be a curve of volume going down up to 1 second or longer
    The envelope you make depends on how the sound is played if you use the volume of the envelope.
    Sustain most often not that used; it is what happens after the decay has finished.
    The Release is the end of the sound. For example, it plays on its own but after the end of everything. It will make some sound bounce back or play the last of the sound. As displayed in the first picture above, it is the last tail of the ADSR envelope.
    Doing a volume envelope makes a difference to the volume you adjust.
    As perhaps a pitch envelope, then you are steering the pitch based on the edit.
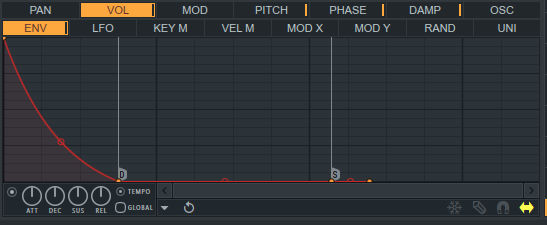
    Sytrus has three types of envelopes. You can also load them in the envelope editor. The first is Normal ADSR, even the one with Attack from low called the String envelope. The other is short decay. Then it is just a Decay envelope and not an ADSR.
    The last is the arpeggiator envelopes. These are based on envelopes, which can be repeated.
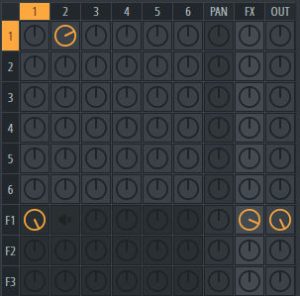
    When you do other OP’s in Sytrus, there are 6 of them:
    Mixing anyone of them with OP 1 will give a twisted sound to the preset. Something called modulation of one sound. It is done with the FM “frequency modulation,” the other one is “ring modulation,” which most often is not used.
    So if you mix it with the OSC which gives the sound in many presets,
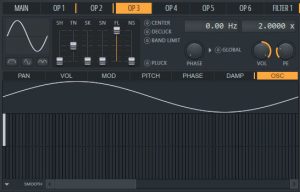
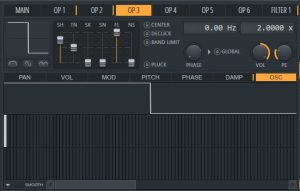
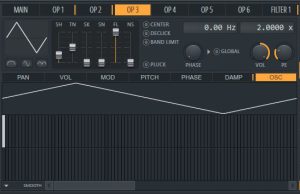
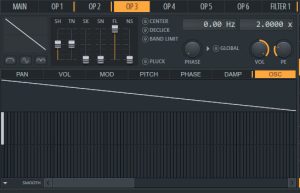
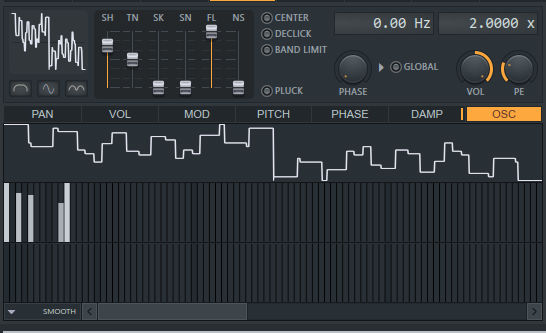
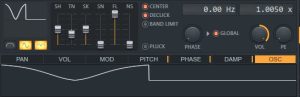
    You can make four different default types of Oscillators:
     
    From top left: Sine, square. From down went: saw and triangle. And they can be changed from the first to the left handler SH “shape.”
    But you can also make them more different from other of the handlers or adjust the stripes “white” to make a different sound. The closest to the left has more bass in it than others in the fields:
    A Sine wave is played in the speakers as the speakers go in and out of its position most often as giving bass sound. The same you get with three others but different volume. Square is most often on and off. Which makes the sound up and down each time used. Saw is just a line that goes from top to bottom and back to top at a range of time. Giving lesser bass power but higher sounding frequencies than other shapes.
    Sine is more like a bass, Square more like distortion, and Saw is like distortion but without most often bass. And Triangle is more likely like distortion with more bass to it. But it does not have to be distortion since distortion is most often a sound that is limited with hard clip. That you don’t get when gaining these waves. But it describes them in the highest range used from 0-100Hz.
    Now other ways to use Sytrus:
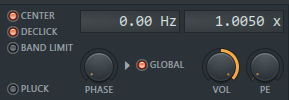
    With the knob called Center, your sound will be centered and not offset. Means your wave will be in the middle range, most often a sound can play the frequencies of a bass longer down or up in the wave and not stay in the middle of the center of a wave, resulting in some speakers a problem to play the sound, also most often the sound will be half of the power it can:
    The Declick is commonly used to remove the cutting or harsh sound of a clip that is cutting up in noise. Most often sounding, you cut the sound with a click in the high frequencies. Declick allows for reducing the problem, as it as well reduces individual other clicks based on perhaps oscillator waves being very distant from their new initiate.
    The 1.0050 x: This option gives you the freq ratio, you can set it to 0.2500 or as very low or higher at 0.5000. You are even putting it to 2.0000. Most often, if you adjust the numbers to around 1.0100, you will get something called detune. A detune when sound is tuned out if it’s origin pitch. That as well sounds good to some synths used in different evil music. But it can sound cool with some sounds. Most often, adjusting to a detune is not well with most sounds.
    To the nearly last needed help to make a Sytrus preset sound is these colored screens:

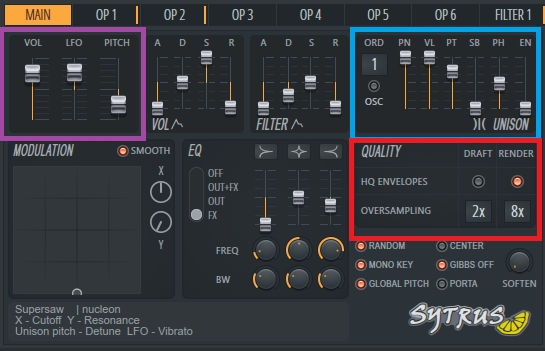
    The blue colored is showing the unison. Unison numbers to the left in there are used to change the number of unisons. These can be set to up to 9. Sometimes using nine will cause a considerable amount of CPU usage. But it can make the sound more stereo-type. You can also adjust other handlers, but the SB will most often give you high-level bass sound, so be aware of using it, as it can overpower anything that is initially playing bass.

    The red is showing Quality; you can set the Oversampling 2x to off. Since it will reduce CPU usage, render is when you create the render of the project. It does not affect what you hear while listening live to the project.

    The purple is showing volume and LFO and pitch. A good tip is to remember that every 12 numbers, you get one octave down or up. You most likely want to have the volume at the middle range.

    LFO: That is used for making sound “Volume” to go up and down like here: When the red has been drawn up to the corner and up with the other one:

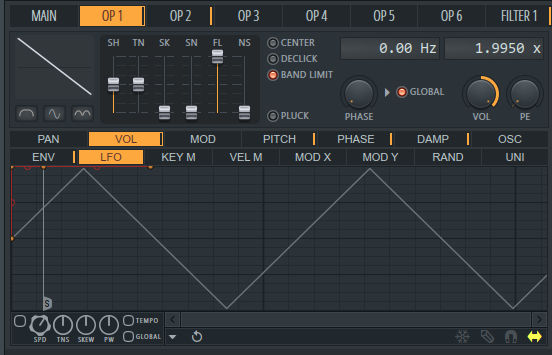
    You can then change the small buttons on the bottom left:  Speed, tension, skew, and pulse width. Then to adjust the LFO in a different matter where speed is when you change the speed of the LFO. Tension is most often used to make the wave of the LFO.

    When editing the modulation of operator 1 to 2 to around 50% will give you a different sound. Sometimes just the adjustment to allow 10% of the modulation to be done is more efficient than using the full range.

    As you also see, F1 is the filter, and it only plays the sound from first frequency modulation as it is also enabled with effects that Sytrus has “FX” as well as dry output to the OUT.

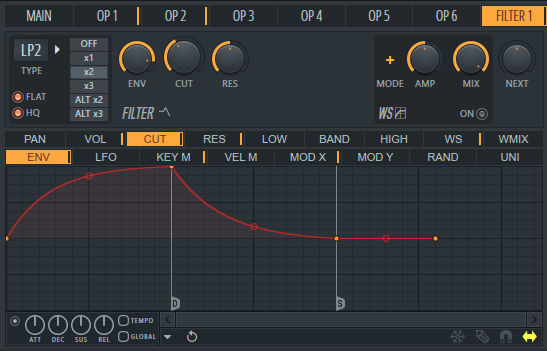
    The filter has two most important things as Volume envelope and the CUT cutoff envelope.

    Volume at the filter is dependable on to reduce the whole sound range into what it plays through the screen. But you can as well use a different type of filters starting with LF2. The cutoff envelope is most often not needed but can be very useful to make a different sound of the sound you play to be filtered automatically.

    You can use the Waveshaper to the top right to add more distortion to your sound tho. Enabling it and adjusting it different is a solution to make sound different. There is also a way to make the envelope for the WS.

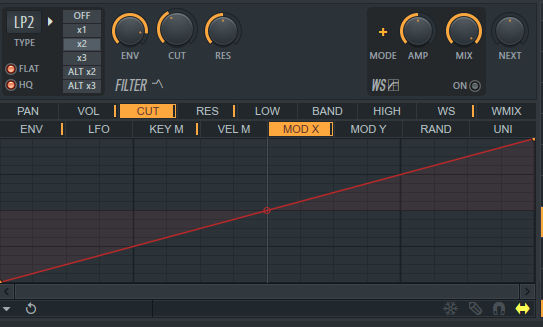
    Sometimes you will need to make the cutoff to be used in the MAIN section from the above envelope:

    That way, you can create an automation clip to the X.

    Enjoy changing many of the presets as well as creating your own!

    Do you want a whole new collection of Sytrus presets around 700+? Well, don’t he budge download it directly from www.dealazer.com/sytrus. 

    basic basics bass change changes changing cool difference different Editing fl studio Guide how to instrument instruments learn learning make making mix mixing morph preset preset making produce producing production Sound studio studios superb synth synths Sytrus tip tips tricks Tutorial tutorials tweak unique
    Next Article Wheel of Fortune – Arpeggiator of the Maximum
    Swagger
    • Website
    • Twitter

    Artist | Rapper | Unique Vibe | Only Sytrus | Beat Producer | Singer | Wonder Trance | Blogger | Designer | Photographer | deaLazer.com<-- Books and onsite Phone Player

    Related Posts

    featured image

    Extremist – Distortion Plugin for anything

    9.0
    featured image

    Why and how to master most of your synths and pads?

    featured image

    PissCutter by NovaKill – Analog Dry Sound

    8.0

    4 Comments

    1. Pingback: Dealazer Sytrus Presets – The Collection of 700 free presets | Dealazer

    2. Анастасия on June 24, 2020 6:41 am

      89035307091

      Reply
    3. Pingback: Dealazer Sytrus Presets – The Collection of 700 free presets | DEA Lazer Music for Another Generation

    4. Sherry Rosenstengel on March 9, 2021 7:45 am

      Hello to everybody, it’s my first pay a visit to this blog; this blog contains remarkable and genuinely excellent material in favour of readers.

      Reply

    Leave A Reply Cancel Reply

    Tweets by
    Search On Google
    featured image
    9.0

    Extremist – Distortion Plugin for anything

    featured image

    Why and how to master most of your synths and pads?

    featured image
    8.0

    PissCutter by NovaKill – Analog Dry Sound

    featured image

    How to Denoise like a Pro in FL Studio

    featured image

    How to record with FL Studio

    featured image
    9.0

    Horizon Cool Ambient Analog Synthesizer of Diverse Quality

    featured image
    9.0

    Hahaha CS33 – Yamaha Processing Instrument – Analog

    featured image
    8.0

    Classic Plugins VST – Collection of old mints

    showing autotalent
    9.0

    Autotalent – The oldschool Autotune vocal pitcher

    featured image
    9.0

    Ambience – Frequency Reverber

    featured image
    9.8

    Altair 4 – HG Fortune SCI-FI ufo Synthesizer

    featured image
    8.0

    Hybrid Ambient Alieno Synth – Analog Processing

    featured image
    9.8

    Duvina Loop Pack by Dealazer

    featured image
    9.0

    Itchy Synths Collection Download!

    featured image
    9.0

    MHorse P3 & Mhorse by Terry West

    featured image
    9.0

    6144 by DDMF.eu

    Earn Big Bucks on your SIM Card in your Phone – Sell your SMS

    How to make: Hard Trance or a Hard Dance Track?

    Producers need better EQ from 3000Hz-22000Hz Since that’s the honeyspot of the feel

    FL Studio Video Tutorials on Hip Hop & Trap Making – Splendid ways

    How to set correct vocal timing for your collab project with the rapper?

    How to do a Proper Render? If Your Render is Wrongly Rendered

    How to: Principals of ADSR – Attack, Decay, Sustain and Release

    showing How to Fl Studio featured image

    How To FL Studio? – Learn What You Wrongly Learn/Learned

    how to do distortion featured image

    What is distortion or saturation? How to implement the use of distortion in music making?

    showing quote in article

    Motivation for Producing and Making Cool Music

    learn how to compress Bass or 808 with maximus- Loopswag

    How to compress? Bass or 808? With Maximus?

    Unique picture of several pictures royalty free

    Making Notes in a very uniuqe different way? Perhaps adding a Flavour to your Piano or Synth-Pad

    featured image

    DeEssing on Syllables and s and f letters that clearly make the shii sound in your vocals and the hiss

    what is the best app for creating cover art for an album question

    What is the best app for creating cover art for an album? Gimp!

    featured image

    Technique: Effect sending to panned Mixer unit for more Stereo Uniqueness

    featured image

    CryptoTab Browser – Unique Mining Browser which gives you any Extra Money by using your CPU

    featured image

    Full Bucket Plugins The Collection!

    How would professionals do mixing and mastering? It’s all about Dynamics! – Know your limits

    featured image

    Unveiling the Secrets of a FL Pitcher: Mastering the Art of Strikeouts and Curveballs

    featured image

    How to make that analog master with Maximus – Reduce Distortion – Improve sound

    featured image

    Mastering a song! Or even a whole track of even lost projects and MP3 before release? Our Best Mastering Tutorial!

    showing featured image

    How to Master in a Proper Way Tips & Tricks – The unique way to work your tracks more perfect made

    featured image

    How to EQ – Basic Way – Learn More – Become Professional Using Parametric EQ 2

    Quote The Only Person that can ever truly make you happy is yourself, stop depending on everyone else

    Ten Days of ma Life – Steems To Track – Provided by WonderousBeats.com

    Quote They only support those who already made it. For Clout

    Why aren’t all musicians known to the masses, why are they silenced? Learn how to avoid the tincture of it!

    featured image

    How to send projects to others? – FL Studio

    featured image

    How to fit vocals to beat if its tempo problem? With time stretching?

    featured image
    10.0

    How to Sidechain like a PRO? Your bass with your kick? Learn a new and probably best technique for this

    featured image

    Ultimate Short Samples Collection Volume 1.

    featured image

    How to extract one melody loop? FL Studio

    featured image

    How to make 808 – Video Tutorial

    featured image

    How to use Fruity Granulizer on FL – Video Tutorial

    promotion bitcoin in article

    How to earn 1000$+ worth of Bitcoin with Your 1$ left of debit card.

    featured image in article

    Recommended Collection of VST plugins for Guitar “distortion & effect”

    showing example of plugin vst
    10.0

    Best Bitcrusher There is! .dll only

    featured image

    Free Bitcoin with Alien Mind Control Multiply so you can Win!

    promotion of wonderousbeats.com

    WonderousBeats.com Illest Beats of Unique Quality and Wonder!

    showing featured image

    How to use Stereo Shaper as a 3D Auto Panner? FL Studio

    Dithering explained in a easy way, so anyway always have it on

    showing example of a1stereocontrol
    10.0

    A1StereoControl Master Plugin

    showing featured image

    How to extract Acapella or any vocals out of an Instrumental? Kn0ck0ut

    showing featured image

    How to use Love Philter Tips & Tricks “How to sidechain automate and auto-pan”

    showing promotion of krakli software
    10.0

    Krakli Plugins – Virtual Analog Collection – Direct Links .dll plugins

    featured image

    How to master your vocals the basic and the cool way in FL Studio? The Ultimate Way

    featured image

    Basic Sytrus Tutorial and Usage to Make own Preset

    featured image

    Ultimate Guide: How to Master properly your tracks at the maximum level digital music can do?

    featured image

    How to make vocal tag or beautiful girl vocals with data speech

    featured image

    The Vocal Essential Plugins Collection

    featured image

    How to make a Short Decay Kick with Sytrus and Master it?

    featured image

    How to stretch a beat or vocal – make it bigger or longer

    featured image

    How to Noise Gate Anything or Gate your Mouth Breath with Maximus

    featured image

    The Ultimate SF2 Pack – You want it We have it! For Trap Production Globally Rap Beats

    featured image
    10.0

    How to get all HG-Fortune Magic Collection of free Instruments?

    featured image

    OzzyData v.1.00 Loop Pack by Dealazer – With .flp for arrangement

    feature image

    Basic: How to use .dll Vstplugins in FL 11 or FL 12?

    featured image

    How to make cool Stereo 3D effect on any sound you have in FL?

    promotional revitar post
    10.0

    Revitar – A must have Ultimate Guitar Plugin

    featured image

    How to use the basic Fruity Vocoder in a very Cool way to make robotic sound?

    featued image
    8.0

    Wheel of Fortune – Arpeggiator of the Maximum

    These Tutorials over at Loopswag.com are the hottest at the moment, it helps people clueless about several things that aren't that easy for beginners. Share on X
    Facebook Twitter RSS

    Type above and press Enter to search. Press Esc to cancel.